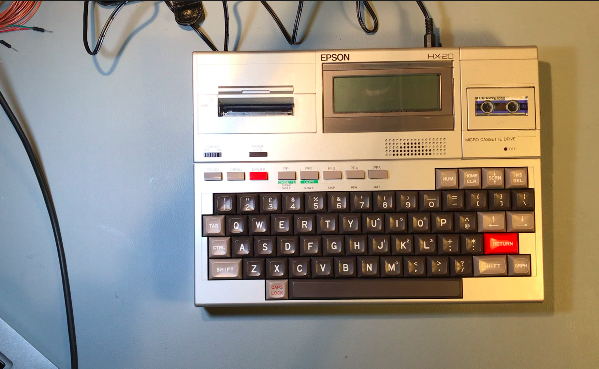
As the time has come to return back to the HX-20. I discovered that the original charger was no where to be found. So it is time to make a new charger for the HX-20.
In this video I will look at why I picked the power supply and show you how I wired up the 2.1mm DC Jack. We will also look at the basic charger circuit and why the power supply may appear incorrect at first, but why it has been selected.
At the end you will hear the HX-20 start, but we will see that there is no video and we will need to look at this is a later video.
Soon after I started out in electronics, I quickly began looking for a device that could program my own EPROMS / Memory from a computer. So when I started doing freelance work, I was able to purchase a Chinese HI-LO ALL02 programmer. The down side was that it required a slot in my PC for the ISA card, which then plugged into its external programmer. It wasn’t portable and it required the PC to do all the heavy lifting. I still thought this was amazing and it was used on many many projects, beginning in the late ’80s right up until the early ’00s. It paid for itself several times over but the only problem I have now, is that the ISA card for the programmer has gone missing (a suspected casualty of a spring clean). Still, I have the programmer and I’m actively looking for an ISA card for it.
When I joined Intermec Ireland, in the mid ’90s, we had a programmer in the service department which allowed us to program PROMs and EEPROMs via the serial port on the PC and while it was slow, it did work. It supported various devices and once the code was downloaded into the programmer, you could program multiple EPROMS in minuets. It made me realise the advantages of programmers with their own intelligence and memory.
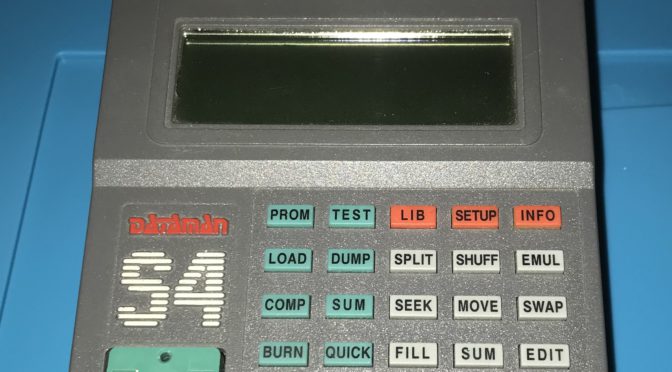
At the same time, the various magazines that I was reading were advertising an EPROM programmer that I thought was perfect. It was battery powered and you could download firmware into it and use it in the field. It not only supported Memories, but Microcontrollers as well. To me, it was the Holy Grail of programmers. It had a display just like my beloved EPSON HX-20 and it could be connected to your computer, via an RS232 port. The programmer allowed the user to view/edit the contents of the memory before programming a device (this was something I had been doing manually to set serial numbers on new products). At that time, USB didn’t exist in commercial PCs.
It was called the Dataman S4 and I wanted one, but there was one small problem, it was expensive, very expensive. I believe that it cost around £450 (€570), just for the basic model. As time progressed, I kept seeing this device in component catalogues from Radionics, and in Farnell, as well as the some electronic magazines. It was taunting me, saying please buy me, please buy me, but I could never justify the purchase. As more time progressed, and my requirements changed, I ended up getting high speed USB programmers instead, at a much lower costs, which supported more devices than the S4, but deep down, I still wanted an S4 programmer.
Recently when looking on www.adverts.ie, I found someone selling an S4, I couldn’t believe my luck! The price was right, it looked in great condition and it was pulled from a working environment. So I pulled the trigger, a deal was struck, and now it is mine. Am I happy? Yes I am. I now have a piece of equipment to add to my vintage equipment kit, that was on my wish list for many years.
Dataman S4 looking good.
As you can see it is in good condition, it’s clean and has very few marks on it. I did notice that the contrast control was not working and was flapping around inside. When I opened the unit, I discovered that the contrast control knob was broken off the contrast trimmer, so this will need to be fixed. The inside of the unit looks clean and original, which I was happy to see. The batteries look original, so these may need to be changed.
Inside the S4 programmer Notice the centre pin of the contrast knob is stuck inside the contrast trimmer. This will need fixing.Logic side, main PCB 512KB RAM
It looks as if no-one has been inside this device, so if it is faulty, I may be the first person trying to fix it. I have been informed that it was working and all it needs is a new 9VAC power supply. The HM628512 RAM Chip, on the bottom of the main PCB, is a 512K x 8 (4MB) RAM. So it looks as if the S4 programmer has the largest memory capacity available – another bonus!
Next Steps: 1) Find/purchase a 9VAC power supply for the programmer. 2) Download and setup drivers on the DOS/early Windows PC. 3) Test-program some EEPROM’s and PALs/GALs. 3) Fix the contrast control.
What are my plans for the Dataman S4? I would like to use this programmer to program the firmware for the retro computer that is being built. I would also like to program the video character ROM and also maybe a GAL, for address decoding.
Today I received a delivery of a box of vacuum tubes, all primarily TV valves from the 1960s & 1970s. Was hoping for some radio valves, but no joy. At least I have these for future projects or I will sell them on eBay over the coming months; or maybe I’ll use a few of these in a couple of experiments. What to you think, anyone got some ideas?
Mullard
EF9 – RF Pentode
EL36 – Pentode Power Output
UCH21 x 2 – Triode Heptode
N308 – ??
PL500 – TV Pentode Line Output
PL36 – TV Output Pentode
EV87 – ??
ELB21 – ??
Radio Haltron
U25 – ??
X78 – ??
Mazda
U191 x 3 TV Efficiency Line Diode
Tungsram
6SA7GT – Pentode Power Output
RCA
35Z5GT – Half-Wave Rectifier
KT (Electron)
KY4 – ??
KR Tubes
ISSK7 – ??
I suppose the first step is to try to find out something about the ones indicated with “??”. Some of these are models that I haven’t heard of before, so there is a little bit of homework to do over the next week or so.
While on the journey of repairing a vintage Ultra Electric R506 valve radio, one item that I left until the end was the repair of the speaker cone. Trying to find replacements (new old stock) for these devices is very hard and in most cases you end up taking parts from another unit (working or non-working). I try to avoid this practice, as this removes one more vintage radio from circulation.
In this speaker there were two nasty tears and a couple of holes in the paper cone. The centre of the speaker was intact, so that was a good starting point and I decided to attempt to repair the speaker cone.
In some cases replacing the cone would be the only option, but for this repair, I remembered an old trick that my father had used back in the late 70’s. As these old radios use a paper composite speaker cone, it is possible to repair some of the damage. Although it doesn’t look very pretty afterwards, the speaker will still be functional, and should sound better.
What you need is the following:
PVA Glue.
Paper towel (kitchen paper).
Flat piece of wood (lolly stick).
Tear a piece of kitchen towel to cover the tear in the speaker (it should be about 1 cm wide to cover both sides of the tear).
Separate the plus of the paper towel and using just one ply, apply the PVA glue to the paper towel. Ensure the PVA glue covers all of the paper towel. I find it helpful to place the piece of paper on the top of a finger and then cover it with the PVA glue.
Carefully apply this piece of paper towel, with PVA glue, to the tear on the speaker. Using the flat side of the wooden stick, centre the piece of the paper towel over the tear. Spread the PVA glue over the edge of the paper towel on to the speaker cone. This will cause the fibres of the paper towel to break apart and become bonded with the paper in the speaker cone.
So, with my speaker cone, I patched the back where the tear in the paper was bad (as you can see below), to help reinforce the speaker. Once I patched the various holes and tears, it was left to dry for a day.
After a day, upon inspection, I could see that the PVA had dried and the repair was successful. When I checked the patches they still flexed when the speaker cone deflected, which was correct.
When I tested the speaker, it did sound much better than before. Although the speaker did not look very nice, it would be covered by the speaker grill in the radio chassis, so I decided not to spray the speaker cone with any paint.
In a recent repair, I experienced an issue where one of the main electrolytic capacitors in the radio had gone faulty. The radio was an Ultra Electric R506 circa 1945, and the capacitor was an old style can capacitor that had two capacitors in the one can. The can capacitor used the outside chassis as the common of the two capacitors (notice the red mark on the base of the capacitor that indicates one of the values of the capacitor).
As you can see from the marking this capacitor has two values, a 16uf and a 24uf capacitor (the 16uf capacitor is on the terminal with the red indicator).
While testing the part, I identified that one of the capacitors in the can had a value of 22.5uf, when it should have read 24uf. When I tested the capacitor for leakage, it was, so this will need to be replaced.
The second capacitor in the can had a value of 7uf, where it should have had a value of 16uf. It was also leaking badly, so that capacitor will need to be replaced.
I could have installed two new capacitors on the underside of the chassis and disconnected the terminals from the old can. While this would have worked it would not have looked professional. My other option was to re-stuff the capacitor can with two new capacitors (modern capacitors are smaller and should fit in the old style can).
I prised open the metal seal covering the terminal block, by inserting a small flat edge under the metal lip, and slowly working the way around the top of the capacitor. If you take your time with this step, you should be able to open the capacitor without tearing the metal of the seal.
Once opened, the next step was to disassemble the old capacitor and remove the old electrolyte and plates from the can. Once this was completed the next step was to prepare the old terminals for new capacitors I would install. I drilled out the rivets for the old terminals and disposed of these.
Following on from this, I built up the new terminal which was going to mount the new capacitors and connections (for the capacitor). This new terminal was constructed from an M3 nut and bolt with a couple of solder tags, flat washers and a lock washer.
Once the old electrolytic capacitor was cleaned, a nut and bolt was used to attach a solder tag onto the inside of the capacitor. A wire was soldered to the solder tag that would then be connected to the common (negative) of the two new capacitors.
As 24uf capacitors are not a standard value, a 22uf/350V capacitor was used for the 25uf capacitor. A new 16uf/350V capacitor was used as a direct replacement for the old 16uf capacitor (both capacitors where high temperature 105 degree C variants).
In the above image you can see that the common (negative) of the two capacitors is connected to the wire/solder tag fitted inside the capacitor can.
Each of the positive leads of the two new electrolytic capacitors, were soldered to the solder tags on the terminal block (note that the solder tag is on the outside of the terminal block to make it easier to connect the wires in the radio back to the capacitor).
Each of the terminals were colour coded to make it easier to identify the value of the terminals. The Blue terminal is the 22uf Capacitor, while the Red terminal is the 16uf Capacitor.
The terminal block was refitted into the capacitor can and the capacitor can was closed by slowly pushing the side walls in over the terminal block (as shown above). This was a slow process, as I did not want any creases in the metal (which tend to be problematic to remove).
Once the seal was closed over the terminal block, the capacitor was tested and then re-installed back into the radio.